Customer Service agents have a lot on their plates as they handle multiple cases daily. Minimising disruptions to their flow of work and reducing the time taken to solve cases are top of their priority list.
In Dynamics 365 Customer Service, you previously had to toggle between screens to access customer details or recent case information while creating new cases.
And taking notes during case creation or adding multiple attachments? That was also not an option.
But, with the enhanced case form in Dynamics 365 Customer Service, you can quickly find relevant information and simplify data entry to manage cases efficiently.
The new form minimises the need for switching tabs, improving your productivity by spending less time creating case records.
Currently, this form is not enabled by default. At the end of the post, we’ve outlined the steps you need to take to turn this feature on. Before that, let’s look at what’s new.
What’s New in Dynamics 365 Case Forms?
Most of these new additions are available out-of-the-box for the case form in the Customer Service workspace. But what if you want some of these features in a different Dynamics 365 form? The good news is you can activate them for any other table you want using the Power Apps maker portal.
Each feature is associated with its own control name, shown in brackets below. Simply locate these components to enable the appropriate feature for other entities.
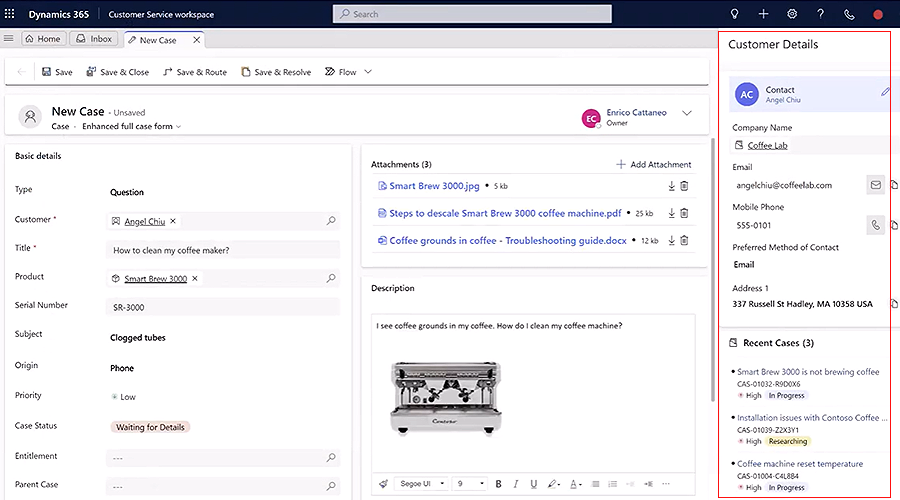
Access customer details easily (Customer 360 & recent records control)
This allows you to see contextual customer data and previous interactions embedded within the case form. Previously, you had to click on the contact record to open a new window to access and edit customer information.
With this improvement, you can now view and edit these details within your workspace. You can also see recent cases raised by a customer, along with their status and priority. This control was available in the older form, but the new version is more detailed and visually improved.
With easy access to previously logged cases, it means you can avoid creating duplicate cases and update existing ones without switching tabs.

Create case records from a conversation
This feature summarises all conversations on messaging channels such as Teams, Live Chat, SMS, or WhatsApp.
When you have a conversation with a customer, an automated meeting summary will recap the issue and the resolution steps you’ve tried.
From this, you can create a new case with a single click, and the summary will be added to the case description.
Dynamics will also automatically enter details from your conversation into the case form, including the customer name, priority, case details, and case status. This means less manual effort and more time saved.
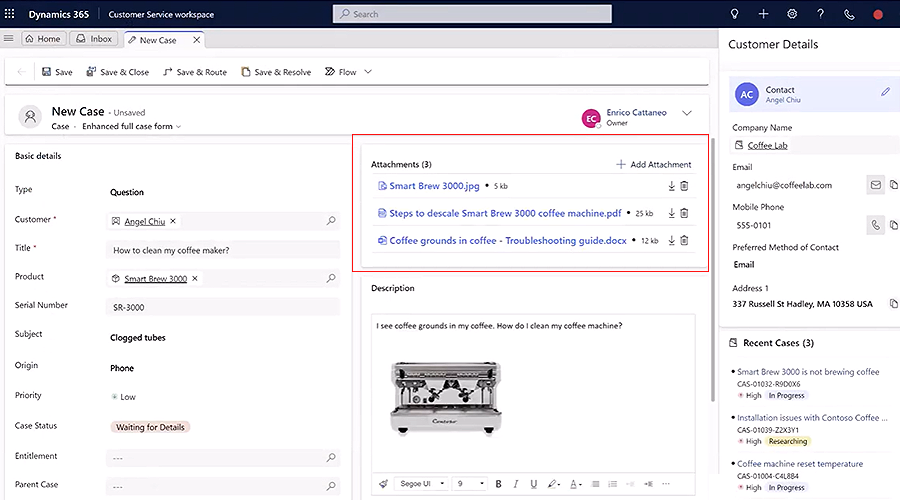
Consolidated attachment view (Attachment Control)
Adding multiple files or screenshots to a case record can often be helpful. Previously, you couldn’t directly add attachments to cases, which required complex workarounds to be configured, such as adding these resources to notes or uploading them to SharePoint.
Even worse, you could attach only one file per record! Adding a second document would override the existing one, which wasn’t helpful.
But the new attachment control makes adding multiple attachments directly to the case record more straightforward.
It not only displays the documents uploaded to the case but can also show attachments from other sources, such as emails.

Add notes during case creation (Notes control)
Currently, you can’t add notes until the case record is created. This may be a minor enhancement, but using the new form, you can add notes on the go without saving a case record first.
Rich text editor for the description field
This makes your case descriptions comprehensive and easier to read. With the new rich text editor, agents can now include images, files, links, and more in the case description.
Colour-coded case priority and status fields (OptionSet wrapper control)
This control helps you identify high-priority cases at a glance. This visual cue allows you to quickly skim through details and prioritise tasks requiring immediate attention.
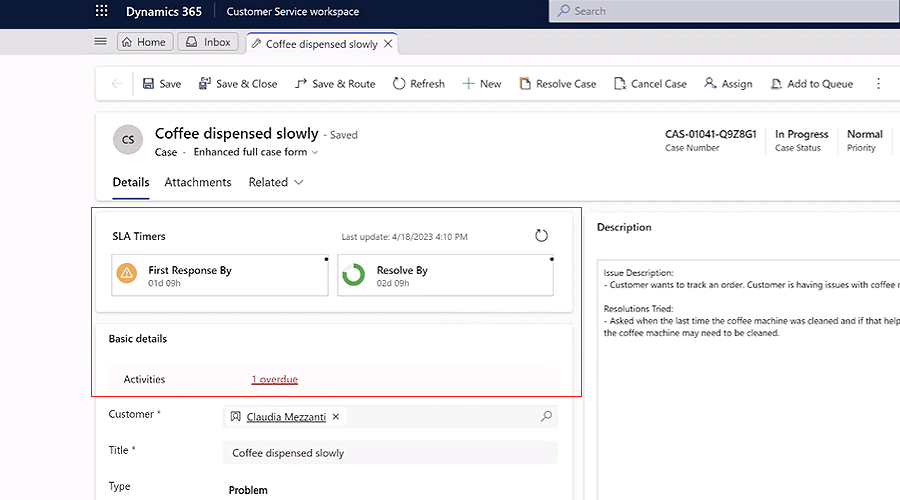
Activity tab (Due open activities control)
This control displays due and overdue activities for a customer or case. Currently, these are visible in the timeline, but it is often cluttered with many updates, and you’ll have to filter for the overdue activities to show up.
The new view displays the pending activities right on top, away from the timeline, enabling you to quickly review and take action.
SLA timer
Many of you might already be using the SLA timer to stay on top of your cases. This isn’t a new feature but has received a minor makeover in the new form with a more modern design.

How to enable the enhanced case form?
Enabling the new case form is really simple. Navigate to the Customer Service admin centre -> case settings -> enhanced case experience. Turn on the enhanced full case form and quick case form buttons.
If you want to customise the case layout and add additional fields, click configure, go to the Power Apps portal and make the necessary changes.
To enable the related customer and recent case cards next to a record, you need to activate a few more options. More details on that can be found in this Microsoft article.
Next steps.
To sum it up, the enhanced case form brings some important updates and a few minor ones. Reducing the need for screen switching enables you to maintain focus and productivity while handling cases.
Please contact us if you need help enabling this feature or exploring any other new capabilities in Dynamics 365.


